
Svchost.exe is a native Windows program. This program hosts and contains multiple services. These services perform multiple functions within your Windows environment.
Regardless of which Windows version you use, svchost.exe can have multiple instances. One instance can host single service or multiple services. It depends. All in all, Windows comes with many native services and svchost.exe executes them. The most reliable and easiest way to limit CPU usage is to turn off unnecessary Windows services. RegInOut does this job quite well. Download it from the following link, and speed up your computer in minutes:

Step 1
PC Speed Slow? Download Extreme Performance Booster
Reginout Download (w/ Verisign Digital Certificate)
Compatible w/ Windows 10, 8.1/8, Windows 7, Vista/XP.
By clicking to download, you agree to these Terms
See Features & Functions
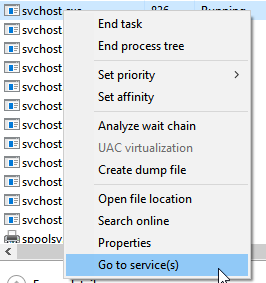
Windows Task Manager shows each instance of svchost.exe. To find out the related services of each svchost.exe instance:
- Right-click on a particular instance;
- Click on the “Go to Service(s)” menu item; and
- Then it takes you to a new tab. There you’ll find each service related to the svchost.exe instance.
But hey, you can also see svchost.exe instances in the Details tab in your Windows Task Manager. How? Press Ctrl + Shift + Esc, one by one.
![]()
Symptoms
Want to know the symptoms? Oftentimes, svchost.exe consumes more memory. This increase in consumptions makes your system sluggish. And it affects the productivity and efficiency as well. It’s a bit hard to fix it since there’s no information available about the individual use of each service. Remember: The consumption showed in your Task Manager consists of multiple services into each svchost.exe instance.
A continuous increase in the use of memory will not give you free memory to run your applications. And the result: your computer jams and your applications tend to respond slower.
Why does it happen?
Let’s face it: There’s no quick-fix solution. Possibilities abound. These possibilities rely on several factors and system configurations: Windows version and hardware drivers. Remember:
- If a native Windows service is the culprit, then it is a possibility that a third-party software has either blocked, corrupted or altered the system files. Third-partyware includes malware or a system modification software, such a Windows transformation toolkit or something like that. They modify your system files.
- If a third-party service is the culprit, then your service driver isn’t compatible with the Windows. Or, your service driver is poorly coded or files are from an unknown, unreliable source.
How to Solve?
That’s the main point. But don’t worry, we’ve found top eight solutions for you:
Solution 1
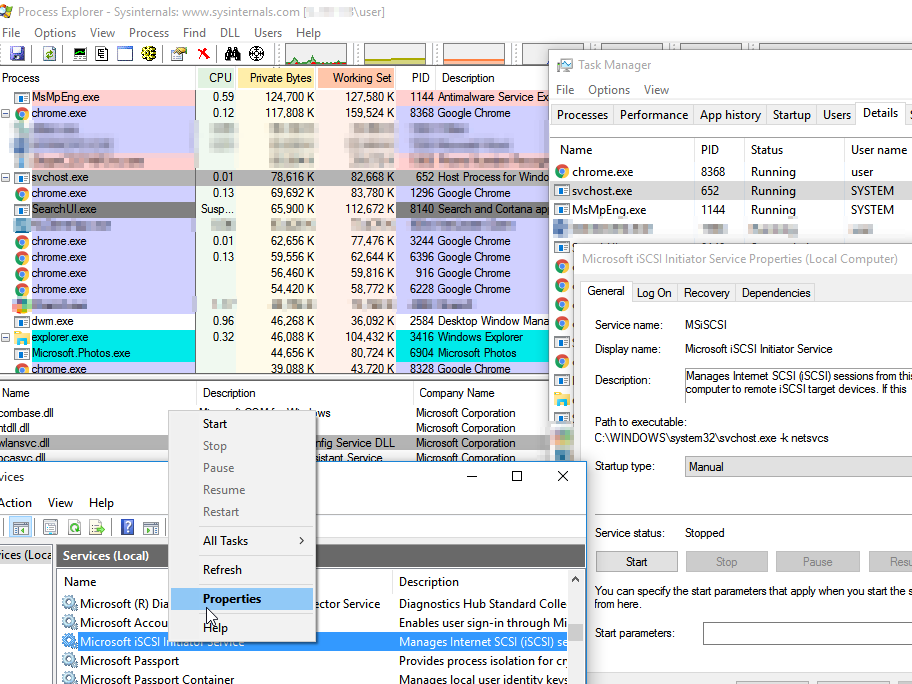
- Download Processor Explorer from:
- Open the Task Manager.
- Go to Details Tab.
- Click the Memory column (it sorts out the process list in the highest to lowest order).
- Find the highest memory consuming instance of svchost.exe. Note down its PID. (Refer to PID column).
- Open the “Processor Explorer” as Admin (Here’s how: right click the procexp.exe -> Run as admin).
- In the main User Interface (UI), click View -> View Lower Pane (This opens up the detailed view of each process).
- To find a relevant svchost.exe instance, find “PID” in the Processor Explorer.
- Click svchost.exe instance. It loads its library files in the View lower pane.
- Click “WS Private.” It sorts out the list view. You’ll get the highest memory consumed library file here. WS Private shows the memory reserved for a particular application file. Make sure you note down its description. It’s helpful for you to get the correct service from the Windows Service.
- Open the Start Menu. Type services. It opens the Services.
- Use the Description to figure out the related service name.
- Right-click on that particular service. Go to Properties. Select Disabled as its startup type. Click on the Stop button (it terminates that service). Restart your system to make these changes effective.
Solution 2
Analyze your system files using SFC. It identifies all corrupted system files. You can also repair Windows system files. How? Use this command:
- Start -> cmd -> Right click and select Run as Administrator -> type sfc /scannow -> Enter
Remember: The process is compatible with Windows 10, 8.1, 8, 7, Vista. It scans the whole system files and repairs all corrupted files (if any).
Solution 3
Need to fix core issues in your system? Update your Windows. Here’s how:
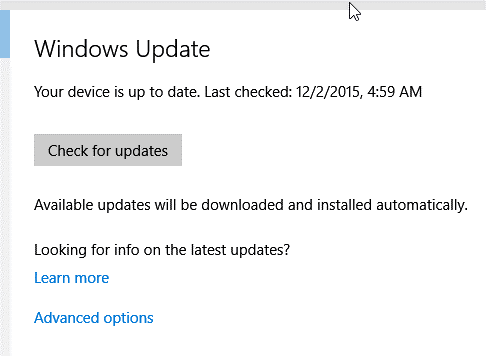
- Click Start.
- Type Check for updates.
- Open it from the Search Results.
- Click Check for updates (This will check for the latest Windows updates).
Got the list of updates? Your Windows now downloads all of them or the ones you selected, automatically.
Solution 4
As mentioned in the Solution 1, identify the processes consuming higher memory. Then you’ll be able to find the respective application or a driver. Visit the publisher’s website to get the latest version.
Solution 5
Are you using a third party tool? Analyze the minimum, average and maximum use of memory and clear your system memory. Remember: it’s a temporary fix for those who don’t want to restart the system to refresh the system memory. Follow these steps:

- Go to this website and download KoshyJohn Memory Cleaner.
- Run it as admin (Right click -> run as admin).
- Click Trim Processes working set.
- Click Clear System Cache.
Solution 6
Scan the whole system for malware and viruses. Why? Sometimes, malware hijack system service files. They corrupt your files or force you to use more resources to harm your system. Here’s how:
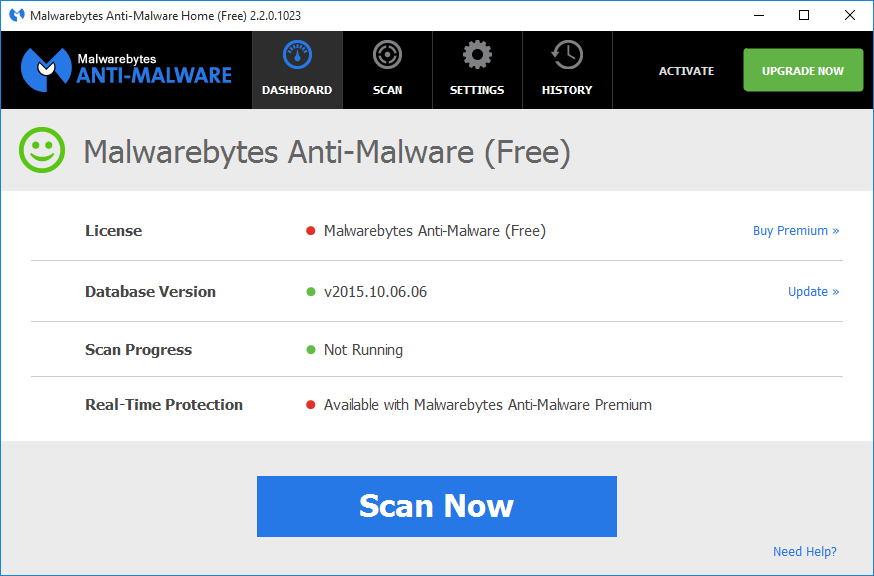
- Download, install and run Malwarebytes Anti-Malware.
- Scan all partitions of your hard disk.
Solution 7
Restart your PC, set it to factory defaults. Here’s how:
- Click Start.
- Type Reset this PC (it opens up the Reset PC window in Settings).
- Click Get Started.
- Select Keep my files (this way you’ll keep all your documents and personal files safe, secure and unaffected during a restart).
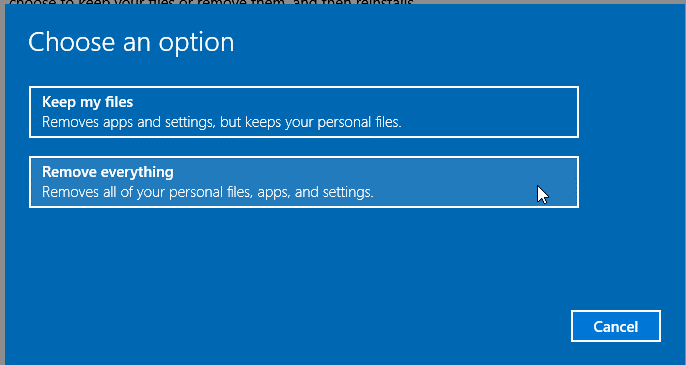
Remember: The reset feature is available only in the newer versions of Windows [Windows 8/ 8.1/ 10]. In case of Windows 7, reinstallation from scratch is a must.
Solution 8
If none of the above methods work, ensure you’ve enough physical memory (RAM). You need a minimum of 3GB-4GB memory (for 32-bit and 64-bit versions of Windows, respectively).
Playing games? Using high-end applications? Or are you a Graphics and multimedia professional? We recommend you to have at least eight (8) GB. Why? For an average home user, 4 GB is sufficient.
Nowadays, DDR3 memories in the market are very cheap. So, consider upgrading your system to a DDR3 motherboard. If you have it already, add more memory to it. Insufficient memory causes an overuse of your hard disk. Having more memory will ensure lower access to HDD and, possibly, increase its lifetime.