
Has the MsMpEng.exe antimalware service executable file rendered your computer really slow? Find solutions in this article to make your computer faster.
Using Reginout System Utilities can be helpful if there are too many services running in your PC. Reginout turns off many unwanted services and makes your computer lighter the moment you turn on the Game Boost feature of Reginout. Use Reginout here: Download it Now. RegInOut is distributed with verifiable digital signature, an End User License Agreement. It contains no malware, no toolbar and no bundled application. You can read site’s privacy policy here.
Did this trouble kick in right when you refreshed your operating system? Quite possibly, the reason is that MsMpEng.exe service is working behind the scenes and consuming an unusual amount of the CPU. If that is the case, then the methods described in this piece of writing will help you out.
MsMpEng.exe is one of the most critical processes of Windows Defender, which itself is the native antivirus and anti-malware solution in Windows 10. MsMpEng.exe sometimes occupies a hefty amount of CPU resources for perfectly legit reasons, but this does have a flip side as it leads to the computer suffering in other areas, such as going extremely slow. This particularly happens when Windows Defender is either scanning its directory, or malware has infected the computer, or the anti-malware software gets stuck while scanning some files.
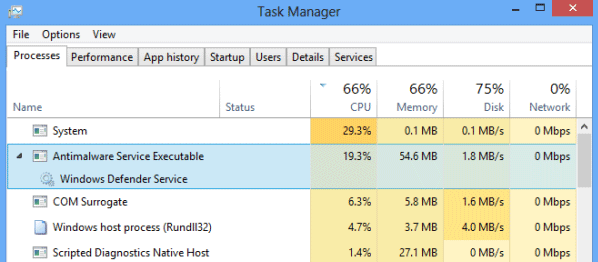
You can easily go to the Task Manager (Processes tab) to check the CPU usage consumed by the MsMpEng.exe process of the Windows Defender. This will help you determine in a better way who is the real culprit as far as maximum utilization of CPU resources is concerned.
In the below screen, you can check that the approximately 20% CPU usage is being consumed by the Antimalware Service Executable alone.
Solutions
Solution 1: Prevent Windows Defender from scanning its own folder
- Go to Windows Defender.
- Go to Settings and select Add an exclusion.
- Now select Exclude file and then add C:\Program Files\Windows Defender.
- Click on Exclude this folder and then save the changes.
Solution 2: Limit CPU Usage in Task Manager
- Open the Task Manager.
- Click on More details.
- Now open the Details tab.
- Right-click the MsMpEng.exe process and select Set affinity.
- Select the CPU limit threshold.
Solution 3: Start your computer in Safe Mode
By starting your computer in Safe Mode you are basically trying to unstick it. Getting into Safe Mode is detailed in the following lines:
- Press the Windows button and click Settings (cog button).
- Now click Update & security and then select Recovery from the pane on the left.
- Click on the Restart now button to reboot the computer.
- Now select Troubleshoot | Advanced settings | Startup settings.
- Press the F4 key to start the PC in Safe Mode.
If MsMpEng.exe runs in the Safe Mode also, right-click it and select End task.
Solution 4: Remove Adware from PC (If you have any)
There are many software programs available on the web that help to remove adware from PC. Some of them are free while there are premium solutions as well which cost you a few dimes. In any case, the adware(s) will be dumped and help you roll back the damage.
Solution 5: Disable Real-Time Protection
The computer’s optimal performance is greatly compromised if the real-time protection of your antivirus program is enabled. The procedure to disable Windows Defender real-time is as follows.
- Press Windows Key + R to start the Run dialog box.
- Type in taskschd.msc and press Enter.
- Double-click Task Scheduler Library on the left pane and select Microsoft | Windows (collapse it).
- Now click Windows Defender.
- Double click Windows Defender Scheduled Scan.
- Deselect the checkbox for Run with highest privileges.
- Now click the Conditions tab and uncheck all the items.
- Click OK to apply all the changes.
Solution 6: Disable Windows Defender Scheduled Scans
If you want to turn off the Windows Defender scheduled scans forever, just repeat the steps outlined above uptil step # 5.
- Open the Conditions tab.
- Uncheck all the checkboxes and click OK.
Solution 7: Restart computer
The most outrageous sounding, yet often helpful remedy is to reboot your system. You just have to restart your computer and the MsMpEng.exe file will.
You can also go for an OS update to improve system performance.
Be advised that disabling Windows Defender totally can leave your computer at the mercy of virus and spyware attacks. Consider suspending it for a specific period of time or reboot your computer. If you absolutely want to disable it permanently, download a renowned security software at the earliest, or else risk jeopardizing your most private data.