
Microsoft Office has had a long chequered history, being an integral part of the Windows family.
The latest member of this family is Office 365 which allows users to sync their files across multiple devices. This allows high productivity. This article teaches how to solve the freezing issues associated with Office 365.
Recommended: System Cleaning is the Answer
Sometimes all it takes to bring the computer as well as any programs that are acting up, back to their optimal performance levels is simply a routine system cleanup task. System cleaning rids the computer of various kinds of junk that keeps on adding up with time and affects it a lot. Use ST Cleaner for cleaning up and optimizing your computer.
ST Cleaner is digitally signed and a safe download
Solutions
Solution 1: Use The Native Repair Tool
Office 365 comes with a repair tool which allows the user to repair the program without requiring any installation media. The secret of this method is having required files, which are used during the repair process to fix the bugs in Office 365, stored on the hard drive. Follow these steps to repair Office 365.
- Click the start button.
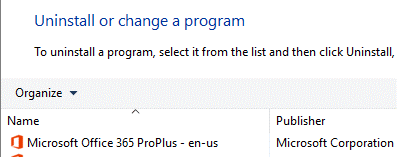
- Search for Programs and Features, open it.
- In the Programs and Features window, search for Office 365 in the search box located on the upper-right corner.
- Once it’s located, click to highlight it.
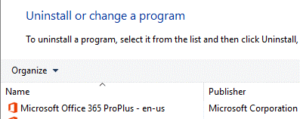
- Find the Change button, which is located in the same row as Organize. Now click to open its window.
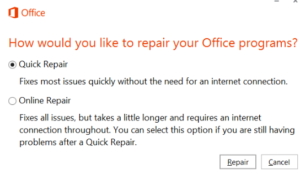
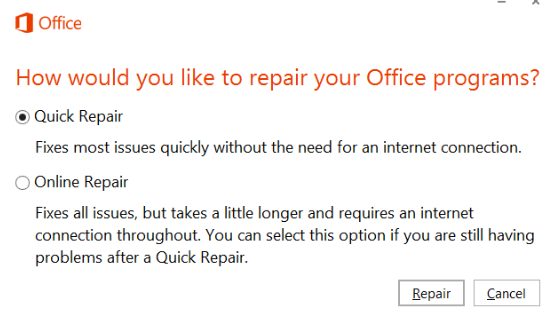
- In the next window, select either Quick Repair or Online Repair.
- Select Quick Repair if the required files for repairing are available on the hard drive. Quick Repair doesn’t require a working internet connection as the files are being used directly from the hard drive.
- Select Online Repair if the required files aren’t present on the local hard drive. In that case, they have to be downloaded in order to repair the office. This is also suitable to fix certain issues which are ignored by Quick Repair and therefore, this method is strongly recommended. Even though it may cost you a couple of megabytes to a few hundreds of megabytes depending on the number of missing files and availability of the latest updates, the reliability is quite high.
Select the appropriate option - Restart the system for the changes to take effect.
Solution 2: Remove/Disable/Update ABBYY FineReader Installed in The System
ABBYY FineReader is an OCR (Optical Character Reader) software, known to have compatibility issues with Office 365. Follow this solution to either remove it totally or disable it. You can also update the software to see whether the compatibility issues are fixed or not.
How to Disable ABBYY FineReader
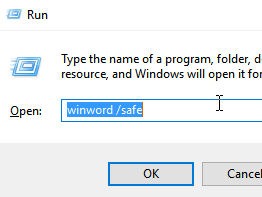
- Open up the start menu.
- Search for Run. Once it’s found, click it.
- Type the following command and execute it by pressing Enter:
winword /safe
- Locate File from the right-hand side panel, click to expand it.
- Go all the way down to the end of the menu and locate Options.
- When the Options window opens up, locate Add-ins from the left-hand side menu, and click to open it.
- Find ABBYY FineReader 12, then click to select it.
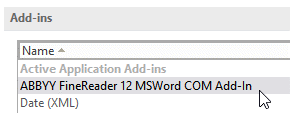
- Move the cursor all the way to the end of the window and locate Manage. Select COM Add-ins from the list. Next, click the Go button.

Click Go - De-select ABBYY FineReader 12 and finally click OK to save the changes.

Click OK to confirm


How to Repair/Uninstall ABBYY FineReader
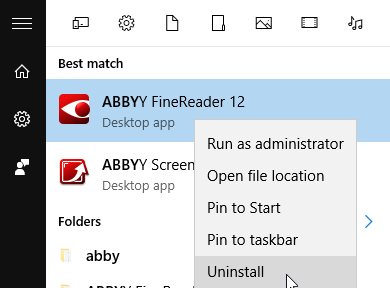
- Click start.
- Search for ABBYY FineReader 12. Right-click it and select Uninstall.

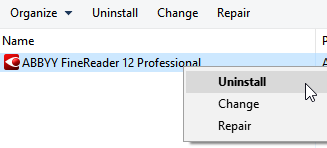
- Locate ABBYY FineReader 12 from the list of the programs installed in the computer. You may use the search box located in the top right corner of the window. (Type its name and press Enter to initiate the search).
- Once it’s found, right-click on it: ->
- To Uninstall select Uninstall,
- To Repair select Repair

Select the appropriate option
Solution 3: Update Office 365
It’s a well-known fact that keeping the software up-to-date is always a good practice, as it helps guard against problems most of the times. The same principle applies to Office 365. Usually, Office 365 updates itself every now and then, but if the automatic update doesn’t work or if it’s disabled manually, follow this solution to get the latest updates for the program.
- Open the start menu.
- Search for Run. Once it’s found click to open it.
- Type the following command and execute it by pressing Enter: winword /safe
- Make sure you are in Safe Mode.

Safe Mode confirmation - Locate File from the right-hand side panel, click to expand it.
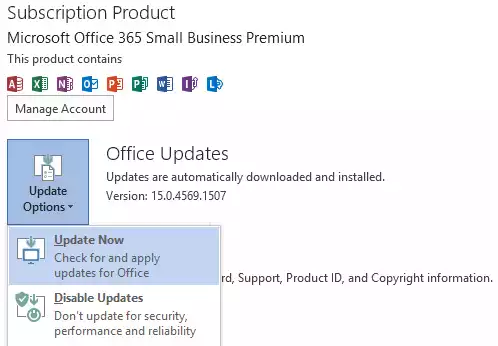
- Go all the way to the down of the menu and locate Account.
- Click on Update Options | Update Now. If the next option says Disable Option, it means that updates have already been downloaded and installed, otherwise, click on it to enable updates.

- Restart Office 365.
