
Sometimes we come across situations where we need to rename a set of files according to a set pattern.
There are 3 main ways of accomplishing this without using any third-party tools.
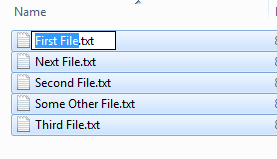
Let’s assume that we have a set of files to be renamed, inside a single folder, as follows:

Using Easy File Renamer
Getting hold of a tailor-made solution to rename files on your Windows 10 computer system is your best bet. Doing so simply does away with any chances of inaccuracies while speeding up the whole process monumentally. You also have the luxury of choosing from 10 different renaming templates. What’s even cooler is you can even rename files on Google Drive! We’re talking about Easy File Renamer.
Rename files in bulk quantities on your computer with ease
Easy File Renamer follows Google software principles
Using Windows Explorer
This is the simplest way of doing it.
- Select all the files (Press Ctrl + A).
- Right-click on the first file and select Rename. Alternatively, press F2.
- Type the Prefix you desire and press Enter. In this example, we’ll type Note.

- Now, you’ll see your files are renamed.


Using Command Prompt
You can rename files with the help of Command Prompt more easily. The main reason is that it supports wildcards to select the files.
Open the Command Prompt and navigate to the target folder. If this sounds overwhelming, right-click on an empty area of the folder while holding the Shift key. Then you’ll see an option to launch Command Prompt.

Once you get the Command Prompt window, you can use the ren command provided by DOS in order to rename a file. And it supports wildcards too.
For example, if you want to change all these files into .html files, you can use the following command:
ren *.txt *.html
On a side note, this command renames all the .txt files into .html files.

Windows Powershell
Windows Powershell gives you more power in performing various tasks, including file renaming.
If you don’t know how to get to Powershell, it comes out of the box with Windows 7 (onwards). Simply search for powershell in the start menu.

You need some intermediate level knowledge of DOS commands to work with this.
Change the active directory to the target folder using the cd command. For example:
cd “D:\My Documents\Fiverr\Rename”
![]()
We have used double quotes around the path of the target folder because it has spaces in between.
We will use the Rename-Item command to achieve this.
If we see the syntax of this command, it looks like below.
Rename-Item [-Path] <string> [-NewName] <string> [-Credential <PSCredential>] [-Force] [-PassThru] [-Confirm] [-WhatIf] [-UseTransaction] [<CommonParameters>]
Let’s see an example.
If we want to change the extension of .txt files into .html, we will use the following command:
Dir | Rename-Item -NewName { $_.name -replace “.txt”,”.html” }
The output will look like this.

Explanation
- Dir command is used to list all the files and folders inside the current folder. So it will give a list of our files.
- “|” is called the Pipe. It pumps the output of the left side command to the right side command. So it will pump the list of files to the Rename-Item command.
- -NewName option takes the current name and parses through the -replace function, which replaces .txt with .html.
You can modify this command to add more text to the filename.
Dir | Rename-Item -NewName { $_.name -replace “.html”,”_new.html” }
This will append _new to the file name (before the file extension).

To read more about Rename-Item, see https://technet.microsoft.com/en-us/library/dd315353.aspx
And to read more on -replace function, see https://technet.microsoft.com/en-us/library/dd315321.aspx (You will need to scroll a little to find the -replace function).