
Many video gamers prefer to increase the Frames Per Second (FPS) of a game by a couple of frames as it increases the user experience along with it.
One of the easiest ways to improve the game’s performance is overclocking the existing hardware. It is inexpensive as there are no hardware upgrades involved and convenient due to the massive amount of tutorials available on the Internet. One of more frequently occurring problems with overclocking is that the GPU gets stuck at some point when it’s being overclocked or when a resource intensive application is running. This is often caused by the user’s lack of experience in overclocking, using poor or unstable software or the user attempting to overclock GPU models that aren’t meant for overclocking. This guide demonstrates how to overcome similar situations and restore the GPU to its stable state once again.
Faster gaming is possible with ST Cleaner. It has unique features which help users play games without lag. Download ST Cleaner here!
Solutions
Solution 1: Restart The Computer
There are two ways of overclocking a GPU, namely factory overclocking and software overclocking. These methods basically embed the Core/ Memory/ Voltage increments right into the video card’s BIOS and then increase these values in real-time through the software. The software which is being used to overclock is launched usually during the startup of Windows. So technically a GPU can be set to default by restarting the computer as long as the changes aren’t embedded into the video card’s BIOS.
- Close all the applications.
- Restart the computer through the Start menu.
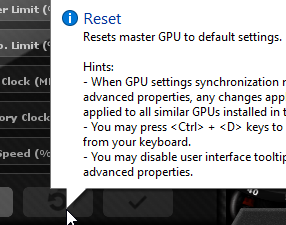
Solution 2: Reset The Values to Default
There are various sophisticated tools available nowadays which help in overclocking a GPU with ease. One such compelling applications is the MSI Afterburner which has been a hot favorite overclocking tool among enthusiasts. It isn’t linked to any Graphics Card brand; hence it can be used with both Nvidia and AMD. So if MSI afterburner is used to overclock a GPU, use the following steps to reset the values to their default.
- Launch MSI Afterburner in Administrative mode.
- Click the Reset button to reset the values to their default.
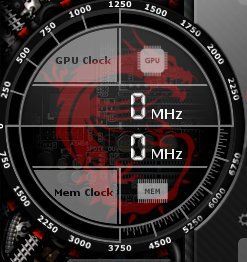
Resetting the values - Once the values have been reverted to their default state, this can be verified through the meter which displays both GPU Clock and Mem Clock (as seen in the following screenshot).
Solution 3: Cleanup the Driver Files and Reinstall the Drivers (For AMD GPUs)
AMD, the designer of Radeon GPUs has designed this special tool known as OverDrive which helps in overclocking AMD GPU based Graphics Cards. The application is totally free, and therefore is widely used. As reported by some people, sometimes the tool prevents its values to be set to default, and thereby leaves users at the mercy of luck. If the values set are good enough for the GPU to perform in a stable manner then it’s not a big problem, but if this isn’t the case, the following steps have to be taken to address the problem.
- Reboot the system to see if this helps reset the values in OverDrive.
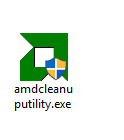
- Download AMD Clean Uninstall Utility from this web URL.
- Install it and proceed with the given instructions on the application to discard every single information associated with AMD drivers.
- Restart the computer once again.
- Install OverDrive, and now check the results.
Solution 4: Overclock Properly
Gaining experience is vital in every single sphere of life, and the same holds true for overclocking. If you’re a rookie, you can easily master it by taking into account the following tips. This segment assumes that MSI Afterburner is used for overclocking due to its wide compatibility with many GPUs. The purpose of this section is to demonstrate how to properly perform overclocking to avoid GPU freeze issue.
- Download MSI Afterburner from this URL. Make sure you ONLY download a stable version.
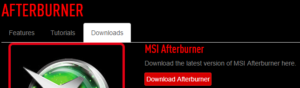
Downloading MSI Afterburner - Once the download is over, initialize and complete the installation.
- Download Unigine Heaven through this URL. This is for testing the Graphics Card for its stability and performance. Execute the setup launcher and complete the installation.
- Launch MSI Afterburner and raise its value by 10MHz. Now apply the changes by clicking the Check button.
- Now launch Unigine Heaven and run the benchmark. The benchmark should look like this as shown in this YouTube video: https://www.youtube.com/watch?v=9F6zSgtRnkE
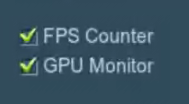
- In Unigine Heaven, locate and open Settings (top-left corner). Now check the checkboxes for both FPS Counter as well as GPU Monitor. This basically renders the Heaven benchmark to display GPU temperature and FPS. Keep an eye on both these values. The temperature of the GPU should not exceed over 80℃ – 90℃ depending on its brand and model. Nvidia cards are known to have a high-temperature tolerance value. If you start getting a black screen, distortions or poor performance it means the GPU being used in the system doesn’t support overclocking. In all other scenarios, proceed to the next step.
- Here we’re assuming that the GPU is stable with an additional +10 MHz clock speed. Now it’s upto you to prevent overclocking or keep pushing the limit until it hits the boundaries. If you decide to go for the latter scenario, be sure to keep increasing the Core Clock speed by 10 MHz, as this increase leads to the relaunching of the benchmark again and again to see if the GPU reacts fine to the new value.
- When it’s not stable enough (i.e. the benchmark starts exhibiting odd behavior such as black screen, stutters, poor performance or even blue screen of death), start increasing the GPU voltage by 10 mv just like you increased Core Clock speed while testing the GPU with Unigine Heaven until it returns back to normalcy.

- Now repeat the same step to increase Memory Clock speed. Make sure in each trial both the temperature and frame rate are in good shape before you proceed to the next one. Usually, the recommended temperature for GPU is anywhere between 80℃ – 90℃.
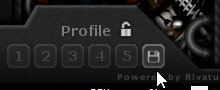
- Once the overclocking is over, save all the changes in a profile slot to make sure values are there in case a mishap happens in the future.
Saving up the changes - Click Startup to make Windows launch it automatically. As a result, MSI Afterburner can now automatically apply changes at Windows bootup.
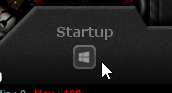
Selecting Startup
