
Windows 10 has attracted interest from almost a huge majority of users who were using any of the previous versions of Windows when it was released. And so people started upgrading to Windows
10 in droves.
If for some reason, you feel Microsoft’s latest operating system is just not made for you, you’re just a single click away from downgrading back to your previous version provided you make a decision within a month after upgrading to Windows 10. And if you’ve passed the 1-month limit, you can take a little long but nevertheless helpful route of downgrading through the Windows installation media. In case you’re not satisfied with the speed of Windows 10 but wish to continue using it, download ST Cleaner software and thoroughly clean your computer. Get it here:
Clean up Windows 10 Easily
ST Cleaner software is downloaded from official website only
Step # 1: Backup your Documents on Cloud/ External Storage
- Click File Explorer icon on the Taskbar.
- Open the following location:
C:\Windows.old\Users\%username%\Documents - Copy all documents to a USB flash drive/ external hard disk. Alternatively, sign in to your cloud account, click the Upload icon and upload all of your documents and files.
- You can find various other subfolders in the UserName root folder such as Music, Videos, Downloads, etc.
Bonus Tip: Download Clone Files Checker and scan your documents and files for duplicates before you backup them on external media or cloud storage. This will save a lot of time, reduce redundancy of the data and save network bandwidth.
Step # 2: Perform Downgrade
Scenario # 1: During One Month after Initial Upgrade
- Click the Start icon on the Taskbar.
- Select Settings.
- Click Update & Security icon.
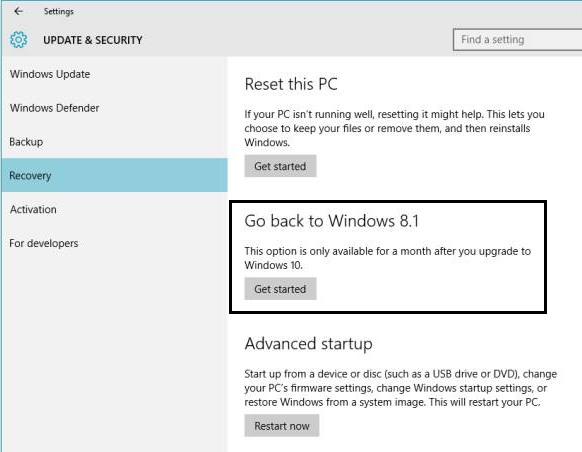
- Click Recovery tab.
- Click Get Started under Go back to Windows 8.1 or Go back to Windows 7 (depending on the circumstances).

Go back to Windows 8.1 / 7 - You’ll be prompted to select a reason. In the Why are you going back? page, select a reason that compelled you to take this decision.
- You can also provide additional information in the Tell us more textbox to help Microsoft bring in further improvements in Windows.

Provide feedback - Once you’ve selected the reasons that made you switch back and (possibly) entered text in the Tell us more textbox, click Next.

How does it work?
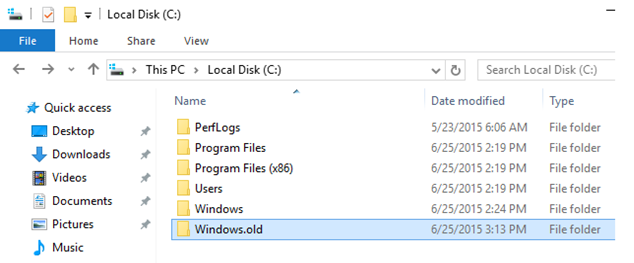
During the upgrade interval, Windows setup moves all files from the previous installation to Windows.old folder. In the newly upgraded Windows 10, the folder is accessible from the root C:\ drive. These files are used when you downgrade to an earlier version.
Unexpected situation: “Go back to Windows 8.1” or “Go back to Windows 7” option isn’t available during the first month
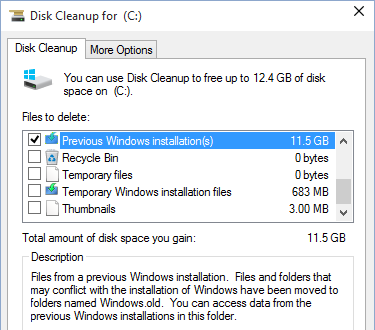
If you ran Disk Cleanup recently, you might not be able to revert to the previous version of Windows using one-click option.
Disk Cleanup analyzes detailed information about various temporary files that consume a large amount of space on the hard drive. As you can see in the screenshot below, it shows Previous Windows installation(s) checkbox along with the total disk space it occupies. You might have checked that box during the cleanup process.
Scenario # 2: How to Rollback once a month has passed since you switched over to Windows 10
It’s been more than a month after your Windows 10 upgrade. And so you won’t be seeing the single-click downgrade option. Don’t worry, there is still an alternative option available. You should be able to use the Windows 7/ 8.1 installation media to format the partition containing the current Windows 10 installation and reinstall the earlier version.
- Insert Windows installation media in the DVD/ CD Drive.
- Press F2 or Delete key until the BIOS Setup opens up.
- Go to the Boot Order.
- Set First Boot Device: Hard Disk; Second Boot Device: DVD/ CD ROM.
- Go to Exit menu > Save changes and exit.
- Your laptop will restart. Wait a while until the Press any key to boot from DVD… message appears.
- Press Enter.
- Follow the installation wizard till the end to complete the Windows 7/ 8.1 setup.