
Windows 10 Creators Update comes with many interesting features such as better trackpad gesture control, blue light reduction, custom accent colors, new themes, and Windows Holographic integration.
However, some users have also complained about their PC performing quite slow than before once they’ve installed the Creators Update. If you want a quick boost in speed, try cleaning Windows 10 junk using the ST Cleaner software.
Speed up Windows 10 After Creators Update
ST Cleaner is distributed with verifiable digital signatures
Defer the Upgrades
If you have either the Pro or Enterprise version of Windows 10 installed on your computer, you can rollback your system to undo negative effects of the recent upgrade.
- Click Start | Settings.
- Select Update & security.
- Select Windows Update.
- Open Advanced options.
- Select the checkbox for Defer feature updates.
Optimize Startups
Some programs start automatically when you boot the computer. The aim is to minimize these startups and services.
- Press Ctrl + Shift + Esc keys simultaneously.
- Select Task Manager.
- Select the Startup tab.
- Disable all the unnecessary startups.
- Now click on Disable and select the Services tab.
- Select the Hide all microsoft services checkbox.
- Uncheck all unnecessary services you want to disable.
- Click on Stop.
Note: When you are unsure about optimizing computer’s startup, consider using a third-party solution such as Reginout System Utilities. It will also optimize Windows 10 services, and speed up your Windows 10.
Change the Boot Time Interval
Try reducing the boot time interval to only 3 seconds. You’ll notice a tremendous improvement in the system performance if you follow this rule.
- Press Windows Key + R.
- Type msconfig and press Enter.
- Click General | Selective startup.
- Select the Load system services and Load startup items check boxes.
- Select Apply.
- Open the Boot tab.
- Set the Timeout to 3 seconds.
- Click Apply.
- Select Advanced options.
- Choose Maximum processor from the Number of processors.
- Click OK.
- Reboot your PC.
Change Power Settings
By using Power Options in the Hardware and Sound category of the Control Panel, make good use of a feature that dramatically improves the startup performance.
- Open Start.
- Click on Power Options.
- Select Choose what power buttons do.
- Open Change settings to view the options that are currently unavailable.
- Click on Shutdown settings | Turn on fast startup.
- Select Save changes.
Update Drivers
Incomplete driver installation and outdated drivers are serious problems that gradually slow down your computer. Device manufacturers release new updates to fix internal bugs and improve system performance. Regularly updating the drivers can improve your computer’s performance.
- Open the Device Manager.
- Right-click any device with an exclamation mark (You have to expand each entry to reveal yellow exclamation marks).
- Select Update Driver Software.
Disk Cleanup
Occasionally you may need to clean up your computer in order to get rid of old software, temporary objects, and junk files. Some software programs might not be completely uninstalled and the leftover files can cause performance issues. Try Disk CleanUp for this purpose.-
- Press Windows Key + E.
- Open File Explorer.
- Right-click on the C drive and select Properties.
- Click the General tab.
- Now click on Disk Cleanup.
- Select all items from the list box and then click OK.
Change Paging File Size
When your computer is running very low on memory, you might want to try out increasing the Virtual Memory.
- Press Windows Key + X, select Control Panel.
- Click on Performance.
- Select Adjust Appearance and Performance.
- Click the Advanced tab.
- Now click on Change.
- Make sure the paging file size is not set to be Automatic.
- Click on the installed system drive.
- Click on Custom size.
- Set the Initial size and Maximum size by taking into account the value recommended by Windows.
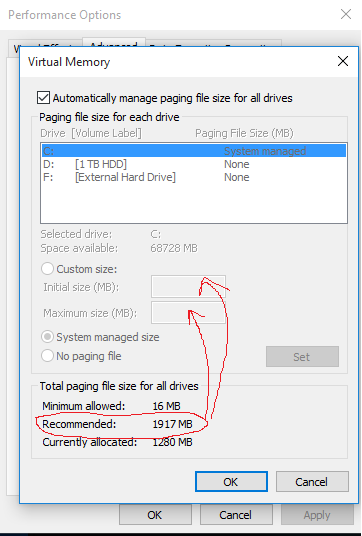
- Select Set.
- Click OK | Apply | OK.
Check Windows Auto-Tuning Status
You might need to check the status of the Auto-Tuning feature in Windows 10.
- Press the Windows key.
- Type in cmd.exe, right-click it and select Run as administrator.
- Type netsh interface tcp show global and press Enter.
- Now Command Prompt will bring up a list of information about the computer.
- Search for the TCP Global Parameter named Receive Window Auto-Tuning Level.
- If the corresponding value is disabled, it indicates the installed version is using Auto-Tuning to monitor and optimize TCP connections.
Use System Recovery
When none of the above mentioned diagnostic strategies work out, you can use Recovery Option as a method of last resort.
- Click Start, and then Settings.
- Select Update & security | Recovery.
- If you recently upgraded your PC, you can go back to an earlier build. Click Get started under the Go back to earlier build heading.
- To reset your PC, click Get Started under Reset this PC.