
A webcam is comes pre-installed with any notebook computer nowadays.
The advancement in the Internet coupled with the availability of superfast Internet connections has heralded the arrival of an era where webcams are considered a must-have by everyone, to connect with loved ones. Webcams come with various sizes and resolutions. It has to be noted that the higher the resolution, the more power the webcam will drain from the computer to process its live feed. Therefore it is highly recommended to buy a notebook with good hardware configuration Today we will look at the main culprits that lead to the webcam’s underperformance, and how to resolve the issues with ease.
Is your notebook overflowing with junk? Is the junk data crippling the operating system, drivers as well as software programs and regularly interferes with their optimal performance? These factors might well be a revelation for you but they are facts! So fix the mess right away.
Clean Up Junk on Your Notebook Computer
ST Cleaner follows Google Software Principles
Solutions
Solution 1: Install The Latest Webcam Driver
Windows often installs its own version of the driver instead of the one designed by the hardware manufacturer. At times, this means the webcam won’t function properly, or won’t work at its full potential. In order to obtain optimal performance, it is recommended to install the driver released by the manufacturer.
- Open the Device Manager, and then locate the Imaging devices category. At times, this category will also contain scanners along with the webcam, so make sure only the webcam device is located.

Collapse the Imaging devices category - Now search for the complete name of the webcam (Manufacturer’s name as well as it’s model) in Google.

- Click the search result that has been fetched from the official website, and download the driver for the respective operating system installed in your computer.

- Once the download is over, execute the setup file, install the driver and restart the computer for the changes to take effect.

Solution 2: Install the Graphics Drivers
Installing the graphics drivers won’t directly affect the webcam’s functionality, in most of the cases. However, some applications utilize the Graphics Card to process the feeds received from the webcam to speed up the time required to draw a frame on the screen. In order to enable the Graphics Card to perform to it’s potential, it’s recommended to keep the driver up-to-date at all times.
To check which Graphics Adapter is installed in the system, use dxdiag (DirectX Diagnostic Tool) command via the Run command (Windows Key + R).
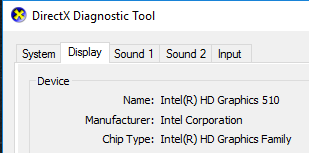
Intel
https://downloadcenter.intel.com/product/80939/Graphics-Drivers
Nvidia
www.nvidia.com/Download/index.aspx
AMD
support.amd.com/en-us/download
Solution 3: Update the Application Software
Just like the Graphics Driver, the software which utilizes the webcam also has to be updated for getting the best possible user experience. Applications like Skype, Viber often release latest updates through their channels, and installing them can make a big difference as far as the overall performance of the application goes.
Skype
- Launch Skype, click on Tool from the menu bar and select Options.
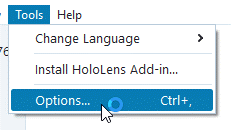
Select Tools -> Options - Click the Advanced category, then select Automatic updates.
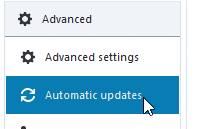
Click Automatic updates - Click the Turn on automatic updates option and then give your approval once the prompt appears on the screen. Click Save in order to save the changes and then restart the application.
Applications installed via Windows Store (Line/ Viber / Telegram etc.)
Nowadays many messenger applications are available on Windows Store, and they can be easily updated at a single click. However, this only works with Windows 8 and above as Windows Store wasn’t available in previous variants of Windows.
- Launch Windows Store, click the following button (see image below) on top of the Windows Store to access the Update center.

- If any new updates are available for the installed applications, they will appear in front of the respective application. Just click the arrow to download the latest update. That’s it!