
We have brought up a few fixes that we hope will prove helpful. And yes you need to keep in mind that these solutions will only work if your PC isn’t a very old one. And if it is, you need to get a new one. So here are the solutions.
Recommended:
Clean Up Windows 10 for a Faster Gaming Experience
ST Cleaner software will be downloaded without any addons. It’s a
clean software distributed with verifiable digital certificate
Solutions
Solution 1: Meeting the Pre-requirements
Before we proceed to the advanced level of tuning, you must ensure that your computer is equipped with the most relevant software programs at all times, for these factors do contribute in getting an optimum experience (gaming experience in this case) as well as reduce the chances of any unexpected crashes.
DirectX
- Visit this URL:
https://www.microsoft.com/en-us/download/details.aspx?id=8109 - Download DirectX and install it.


Visual C++
- Visit the following URL:
https://www.microsoft.com/en-us/download/details.aspx?id=5582 - Select the language which you’re using in the system.
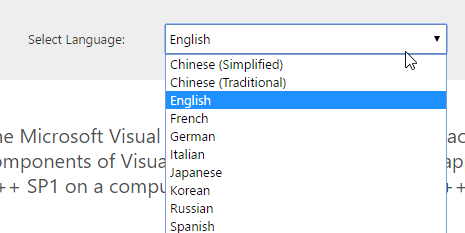
- Click Download to begin the file download and then subsequently install it.

Rockstar Social club
- Visit this URL:
http://patches.rockstargames.com/prod/socialclub/Social%20Club%20Latest%20Setup.exe - You will be prompted to download the application. Click Save and then install it just like any other software.
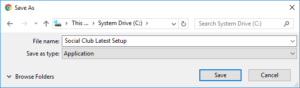
Save the setup file and execute it
Solution 2: Updating The Graphics Driver
GTA V is a highly hardware intensive application which not only burdens the CPU, but it also makes sure it occupies the GPU big time. Therefore it needs a heavy duty graphics adapter that can augment its requirements in order to achieve a smooth frame rate throughout gameplay. However, having a suitable graphics adapter is only 1 part of the story. Equally important and critical is getting the latest software updates for the Graphics adapter so that it can perform at its optimum level.
Nvidia
An automated tool has been designed by the brains behind Nvidia that scans your computer system to look for Nvidia devices and whether they’re up-to-date as far as the driver is concerned. However, it doesn’t function on Chrome due to a new policy brought by Google to further tighten the security of the web browser. So you will need to use an alternate browser for using this tool.
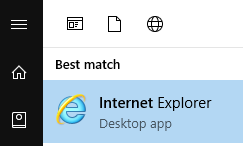
- Launch Internet Explorer from the start menu.
- Now visit this URL:
https://www.nvidia.com/Download/index.aspx?lang=en-us - Locate the grey colored GRAPHIcS DRIVERS button, and click it to initiate the scan.

Select GRAPHICS DRIVERS - On rare occasions, the scan won’t yield any results or somehow die down. In such a scenario, you should visit the following URL and download and install the Java runtime environment which is required to perform the scan.
http://www.nvidia.com/Download/Scan.aspx?lang=en-us

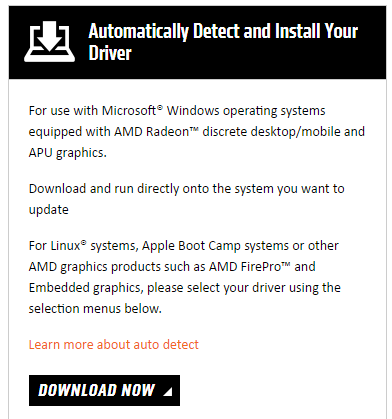
AMD
- Visit this web URL:
http://support.amd.com/en-us/download - Click the DOWNLOAD NOW button in the Automatically Detect and Install Your Driver section.
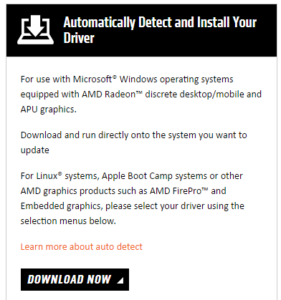
Click DOWNLOAD NOW - Once downloaded, install and execute the application to get the latest driver for the graphics adapter.
Solution 3: Disable the Power Saving Settings
Newer versions of Windows come with an inbuilt setting that helps the computer/ laptop to go on a miserly mode as far as consuming power is concerned. These settings keep any unused hardware idle when they aren’t in use, but they are swiftly made available as and when required. However, the time it takes a when request is made for the resources, and the resources being actually made available might lead to some lags/stuttering in certain high-speed games. Therefore it is advisable to turn off the Power Saver for a more stable frame rate throughout the course of gameplay.
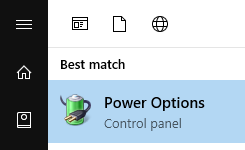
- Search for Power Options in the start menu. Click to launch it.
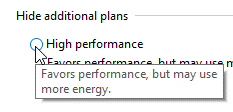
- Locate Show additional plans and click on it to collapse its panel.

Collapse the Show additional plans panel - Now click on High performance. Restart the system for the changes to be permanent.

Solution 4: Lower the Settings
If none of the above-mentioned solutions worked out for you, it clearly means your computer system isn’t capable enough to handle GTA V at its default settings. In this case, lowering the settings is all that you can do, if you can’t upgrade your system at this moment. The following guide provides pre-configured settings for low-end systems. Give it a try as it might help your case.
- Download the settings file from this URL:
https://mega.nz/#!iAUWXDZa!f6h6_U5_lV2jM58Kf6LVcXrvHB3LKkT-qjzUgXunDcw - Copy the file to the Desktop.
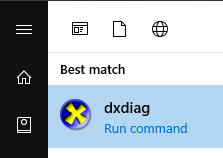
- Open dxdiag from the start menu as seen in the following screenshot.
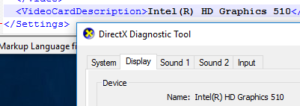
- Switch to the Display tab. Locate Name under the Device heading to find out the name of the currently active graphics adapter.


- Now open the setting file you just copied to the Desktop with Notepad++, or a text editor of your choice.

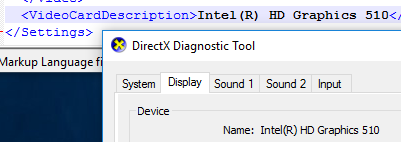
Open it with a text editing program - Scroll to the bottom of the text file until you come across the VideoCardDescription tag. Change its name to the one shown in step # 4 above.
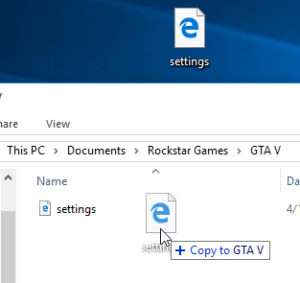
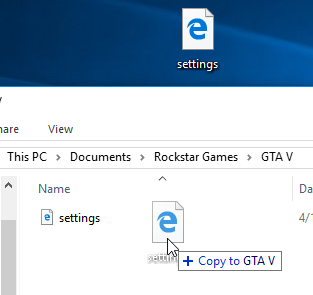
- Save the file and then copy it to the following location:
%userprofile%\Documents\Rockstar Games\GTA V
